
One of the issues that some weavers struggle with is their fell line being curved instead of straight. Having a ‘smile’ or ‘frown’ for a fell line can lead to issues with weaving and there are many different suggestions to help improve the situation. Part of the reason for so many different solutions is because there are several different causes. The challenge is to work out what is actual problem is, and then fix that.
A Frowning Fell
The definition of ‘fell’ is the last pick (or row) of weft in the cloth. A frowning fell is commonly caused by a warp that has not been wound well and the warp goes onto the beam in a ‘cigar’ shape rather than a consistent cylinder.
If the fell is frowning, the first thing to do is check the warp beam and find out if this is the problem. If it is, the best approach is to unroll the warp from the beam and beam it again, this time using firmer warp packing (I prefer wood or bamboo slats) instead of something with less rigidity. The warp packing should be at least a couple of inches wider than the warp so that threads do not fall off the packing.
The warp should also be beamed with tension. For a shorter warp, the tension need not be as high as for a longer warp. Or if the warp is to be woven with gentle force applied to the fell the tension during beaming can be less. But if the warp is to be woven with firm beating, such as for rugs or other ‘dense’ cloth, the tension during beaming should be higher.
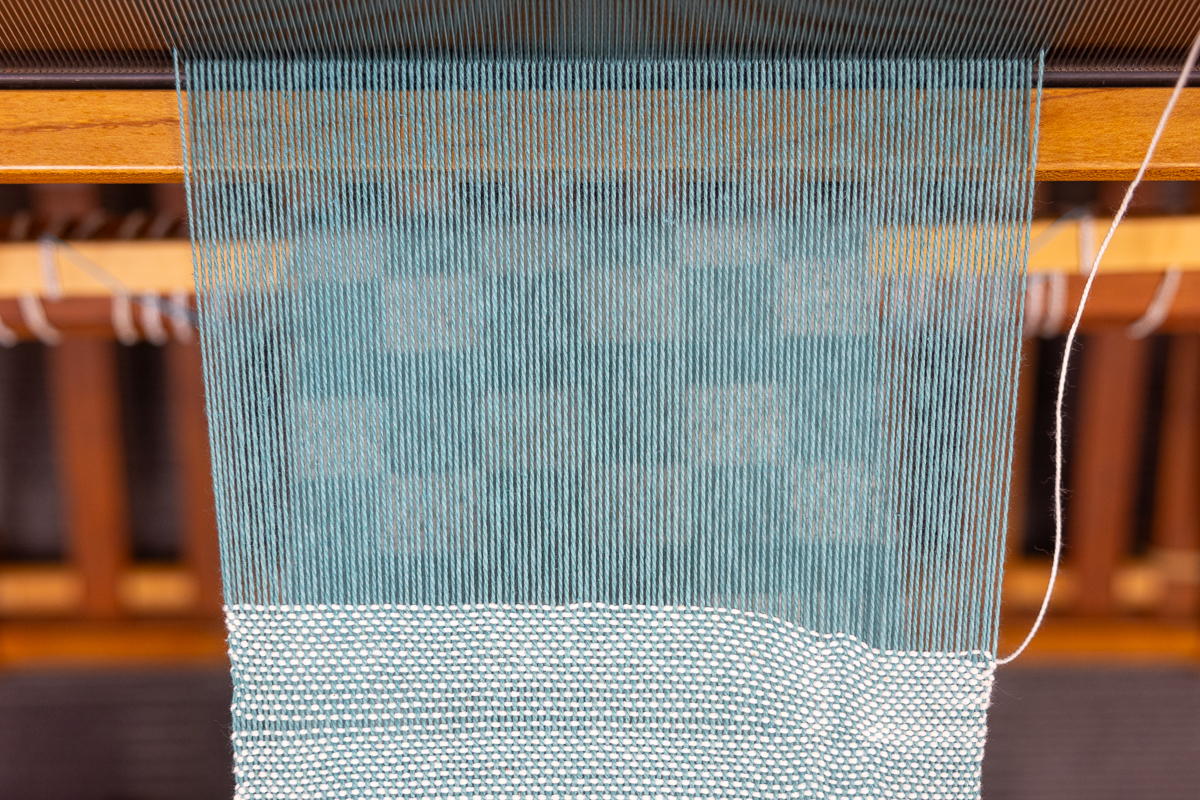
Another indication that too little tension has been used during beaming is a fell line that will be wavy each time it is advanced, and there will be obvious tension differences when the beam is examined.
Depending on what is being woven, this ‘too loose’ issue may not be a problem in the final result, but a note should be made and higher tension used during beaming for that quality of cloth.
A Smiling Fell
A ‘smiling’ fell can be caused by several different issues. The best approach to this problem is to determine what the actual problem is, and then address that problem. While the advice to ‘use a temple’ if their fell ‘smiles’ may help, but other solutions should be considered.
Sometimes it is the shuttle handling. If this is the case, the weaver may want to consider how they catch, hold, and throw their shuttle. There is also an ergonomic consideration in how to use the shuttle, so generally, I will advise people to look at both the ergonomic consideration and the selvedge issue they may be having. The tendency for the fell to ‘smile’ can be linked to excessive draw-in, which may also be part of shuttle handling.
Sometimes new weavers will be told to leave a 45-degree angle on their weft, which is not very good advice because on anything but a very narrow warp, leaving a 45-degree angle on the weft is impossible.
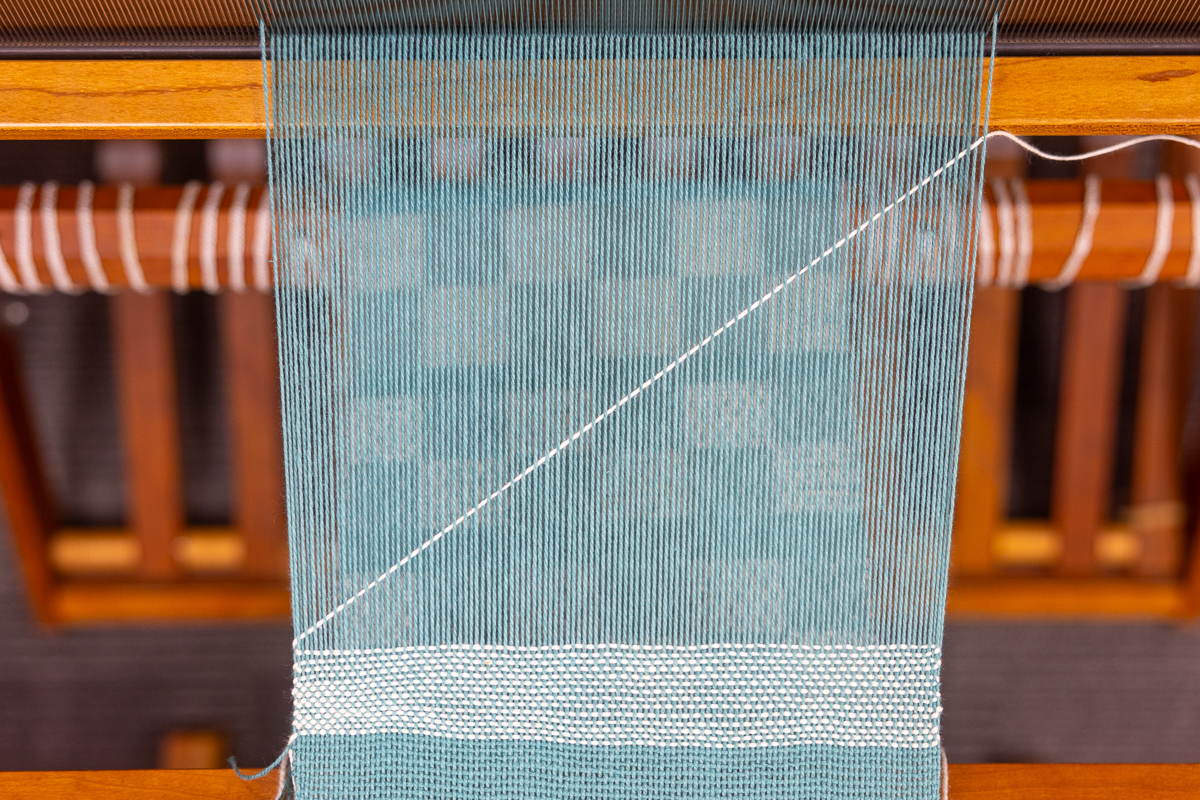
Having excessive draw-in may be a function of beginning by leaving a good angle, then bringing the shuttle holding hand towards the weaver’s body, effectively trapping the shortened weft into the cloth, which then passes over and under the warp ends and draws the warp inwards.
Draw in of 10% is generally considered acceptable – anything more than that can lead to the fell ‘smiling’ and the warp getting more and more narrow, which then leads to abrasion on the selvedge which results in breakage of the selvedge ends.
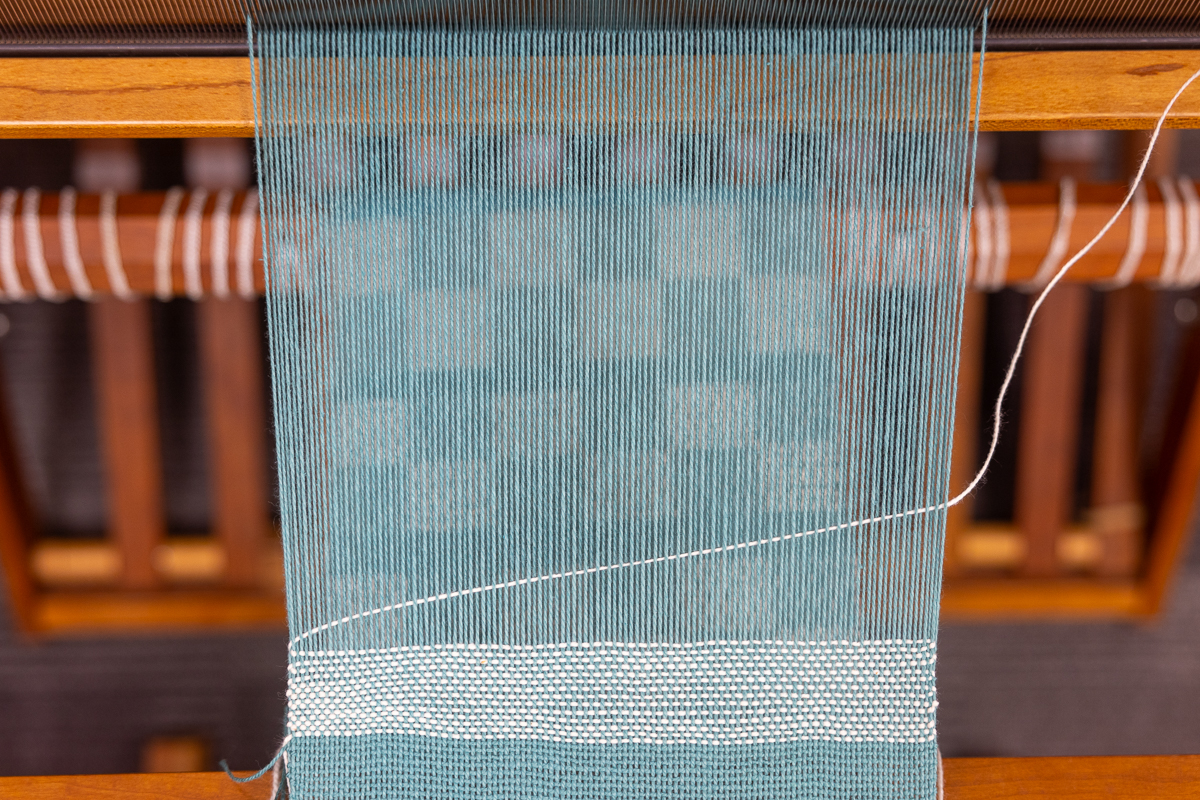
Much better to lay the weft into the shed at around 15-20 degrees, then lift the shuttle hand high enough for the beater to pass under the hand, leaving the leading end of the weft loose so that it can travel the undulating path over and under the warp threads.
Warp Tension Considerations for Smiles and Frowns
One consideration that some weavers do not think about is the role of the amount of tension on the warp.
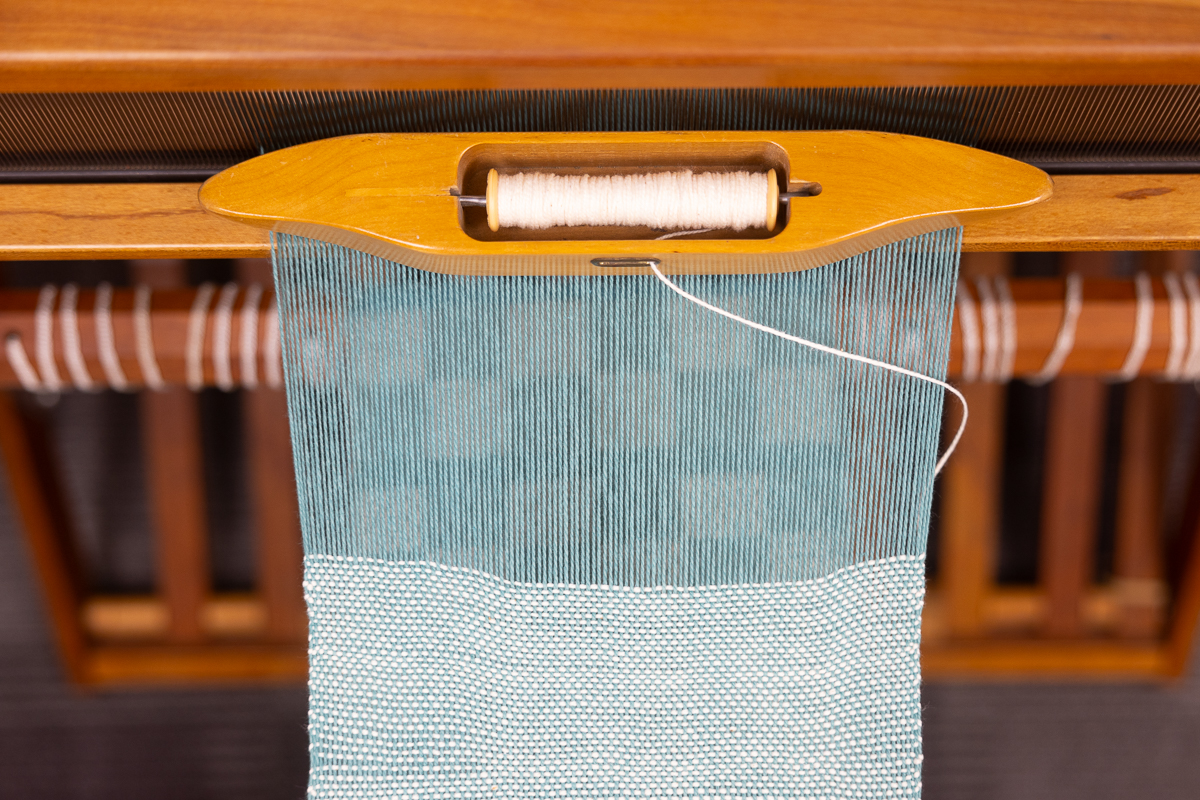
The warp tension should be such that the weft can be gently tugged to seat the weft loop around the selvedge without bending the warp inwards. The selvedge should not look obviously denser than the rest of the cloth. A little is ok, but keep it to a minimum – just enough to keep the selvedge secure.
If the warp is being woven at a ‘loose’ tension, with the shuttle being pulled towards the weaver’s body after the catch, the draw-in can very quickly become excessive and selvedges can abrade and break.
The issue of tension is critical as being as consistent as possible is an important part of weaving a consistently beaten cloth.
One of the pieces of advice to new weavers is to use the same amount of tension each time. This is good advice – but doesn’t cover the changes that happen during weaving as the circumference of the warp beam diminishes, and the cloth beam increases. Also, as the cloth builds up on the cloth beam, it becomes more difficult to reset the tension as the padding of the multiple layers will affect the perception of how much tension is being applied. It may feel like more tension is being applied when it is just the padded cloth beam that makes it feel different.
There are ways to test the degree of tension that has been applied to the warp when the fell is advanced.
- How much effort does it take to apply tension to the warp? If it feels about the same as the previous time, move on to the next check.
- How much effort does it take to open the shed? If it feels about the same as the previous time, move on to the next check.
- How much resistance there is to moving the beater forward? If the beater will move forward to the same point of natural resistance, you probably have the same degree of tension as previously.
If at any point there is more or less effort required, the tension on the warp may need to be adjusted. If there is more effort, less tension might need to be used. Looms with a brake cable can be slightly loosened by very gently depressing the brake release lever until you feel the tension on the warp lessen. If there is less effort, another click (or two, depending on the loom) may need to be applied. Sometimes excess draw-in will cause the selvedges to draw in more than the cloth and the edges of the cloth will become denser and thicker. This is generally referred to as looking ‘taped’. If the warp and weft are different hues or values, the selvedge may look more warp emphasis on one face of the cloth, more weft faced on the other.
Other Considerations
After all of those adjustments, it may still require the weaver to make further adjustments in how much effort they apply to the actual beating in of the weft. Ultimately, it is up to the weaver to use their tool effectively and be aware of their own role in how the tool operates. Constant monitoring and adjusting is a given, when it comes to weaving.
Temples
A temple may assist in keeping the warp spread to the width in the reed, but a temple will not eliminate draw-in. Any weaver expecting to have their finished cloth be the same as the width in the reed will discover that in most cases, there will be dimensional loss. As soon as the temple is removed the weft will want to contract and cause draw-in (and therefore a loss in width). Wet finishing will cause yet more dimensional loss.
The most effective way to use a temple is to keep it near the fell, no more than about one inch (3 cm) away. Weaving beyond this will allow the contraction of the weft to happen and trying to stretch the contracted web out again isn’t going to work well.
The temple works on several levels – by keeping the warp at the fell the same width as the warp in the reed, abrasion on the selvedge threads is reduced. A denser cloth can be woven because the weft will be able to slide closer to the previous pick. When working with a ‘tender’ warp yarn, using a temple will help reduce stress on the warp. When I’m weaving with a temple I will count as many picks as are in an inch’s worth of weaving, stop weaving and move the temple back to very close to the fell. After I move the temple a second time, I will advance the warp. This keeps the fell as close as possible to the ‘sweet’ spot (the area where everything works together most effectively).
While using a temple may be slower, sometimes you need to slow down to get the quality of cloth you wish to have after you’ve woven and wet-finished it.
Plain Weave or Floating Selvedges
Some people advise new weavers to use a floating selvedge, or to have a plain weave selvedge, even when the body of the cloth is not plain weave.
There are some weave structures that benefit from floating selvedges, but sometimes other techniques can be used. For example, when working with two shuttles, I simply twist the two wefts around each other which locks them into place at the selvedge. For some weave structures, the wefts should twist around each other clockwise, but some weave structures will change as the blocks being woven in the weave change. But the eye can begin to pick out what works and adjust accordingly. The ideal approach to weaving like this is to pay attention to what you are doing, stay in the present moment, and work with your tools and yarn.
I don’t recommend having a plain weave selvedge because plain weave will take up more than other weave structures and if the selvedge is plain, the fell will begin to ‘smile’ as the threads build up in the plain weave areas. In order to successfully have a plain weave selvedge, adjustments have to be made to the grist (thickness) of the yarns in the selvedge, and sometimes the loom requires extra shafts in order to achieve plain weave while weaving a different structure for the body of the cloth.
With four shafts it is sometimes possible to incorporate a half-basket selvedge.
Shuttle Handling
Another area of problem is too loose selvedges. Rather than seating the weft securely into the selvedges, the weaver will leave the weft loose and loops can form. What happens in this case is that the selvedges do not take up at the same rate as the rest of the cloth and therefore are not secure. Sometimes there are large loops that hang out which may catch on things. This is a shuttle handling issue and mindful practice of giving that little tug on the weft is required.
As the weaver develops their skills in shuttle handling, the ‘tug’ becomes part of the throw and catch of the shuttle. The weaver no longer needs to stop and apply the tug, but creates the tug as they catch and remove the shuttle from the shed. The whole series of motions involved in throwing and catching the shuttle becomes one smooth ‘flow’ of motion.
Part of the Process
Ultimately, the weaver becomes part of the process such that they can make minor adjustments as they feel slight variations, advance the fell and re-tension the warp, and adjust the force required to place the weft into the fell.
All of this takes far longer to describe than to do. But once the weaver begins to feel the subtle variations in tension, learns how to read the cloth, and handle the shuttle efficiently and effectively, the selvedges will begin to become consistent. They may not be ‘perfect’, but they will be ‘good’.
Dive deeper into the nuances of weaving in Laura Fry’s School of SweetGeorgia course, The Intentional Weaver! We also have lots of great articles in our Weaving Craft Guide!
Not yet a School of SweetGeorgia member but interested in seeing what it’s all about? Come and explore all of our fibre arts courses, friendly community of experienced instructors and makers, and more! Use the code EXPLOREWITHUS to get a 14-day trial for only $1. It’s where multicraftual makers meet — we hope to see you there!
The post Solutions to Smiles and Frowns in Our Weaving appeared first on SweetGeorgia Yarns.


