
To a new knitter, patterns can look like they’re written in another language. And what about all those mysterious symbols on graph paper? Is all that gobbledegook really necessary if all we wanted was to make a scarf? The truth is that while abbreviations and charts can be a learning curve, they actually exist to make the process of communicating knitting patterns simpler. If you’re new to knitting abbreviations and charts, this article will give you a primer on everything you’ll need to get started reading them yourself.
If you’re totally new to all things knitting, be sure to check out SweetGeorgia Yarn’s library of articles or SweetGeorgia Yarns Knitting Craft Guide to get started!
What is the Purpose of Knitting Abbreviations?
Knitting abbreviations are like contractions in normal English. Without contractions like “can’t” or “should’ve”, writing and speaking English would be incredibly cumbersome. The same goes for knitting patterns. Fully spelling out common words like “knit” and “purl” each time they appear in instructions would quickly become eye-glazing, and would quadruple the size of even simple patterns. More complex designs like lace or garments would be an unreadable wall of text if each direction was written without abbreviations. While abbreviations can look scary at first, they quickly become second nature, and learning them makes it possible to knit a whole world of exciting patterns.
Common Abbreviations
While it would be impossible to provide an exhaustive dictionary of knitting abbreviations and their meanings in one place, let’s list some of the most commonly used ones:
- k = knit
- p = purl
- patt = pattern
- st(s) = stitch(es)
- CO = cast on
- BO = bind off
- BOR= beginning of round
- m = marker
- sm = slip marker
- RS = right side
- WS = wrong side
- beg = beginning
- cont = continue
- yo = yarn over
- m1 = make one increase
- k2tog = knit 2 together
- p2tog = purl 2 together
- sl = slip a sticth
- ssk = slip a stitch, slip a stitch, move the slipped stitches back to the left needle, and knit the 2 slipped stitches together
- psso = pass slipped stitch over
- rem = remaining
- rep = repeat
- k-wise = knitwise (as if to knit)
- p-wise = purlwise (as if to purl)
Most knitting patterns and books will include a glossary of the specific terms and abbreviations used. Be sure to check that before launching into a pattern, since some abbreviations will vary by designer and region. (i.e. British and American abbreviations will often differ). Complex patterns also frequently include special abbreviations, which the designer will define in the glossary.
How to Interpret and Quickly Read Abbreviations
At this point, you might be wondering “Do I have to memorize all those abbreviations and what they mean?” If you’re getting flashbacks to high school language classes, don’t worry—knitting abbreviations tend to have an underlying logic to them that will give you clues to their meaning as you read. You don’t have to remember them all by rote (though common abbreviations like the ones above will become second nature with time and practice).
Notice that the abbreviations on the list above are either shortened versions of the words they represent or use those words’ initial letters. So if you run across an abbreviation you don’t know, but it starts with a k, you’re going to be knitting; if a p, then you’ll be purling.
Some also include numbers, which denote how many stitches are involved in the specific direction being given. For example, p2tog is a purl direction and involves two stitches. There are exceptions, and some abbreviations that involve multiple stitches don’t contain a number. But if you see a number, that’s your signal that your next step will involve multiple stitches.
Again, when in doubt, always check your pattern’s glossary to make sure you know exactly what each abbreviation means. But these tricks can help you understand the “why” behind abbreviations and find your way around them just a little bit more easily.
The Purpose of Charts
Once you’re comfortable working with abbreviations, you have the tools you need to learn how to read a knitting chart! Many knitters dread charts, which take the language component out of knitting instructions almost entirely—but guess what? Charts also exist to make knitting easier. They turn knitting instructions into a visual format that simulates the look of actual knitted fabric, which means you can easily compare what’s on your needles to the instructions. They also condense directions even further, making it possible for designers to deliver far more complex instructions with a lower possibility of error. Charts take time to learn, just like knitting abbreviations, but they’re worth it—particularly if you’re a visual learner.
Reading Charts
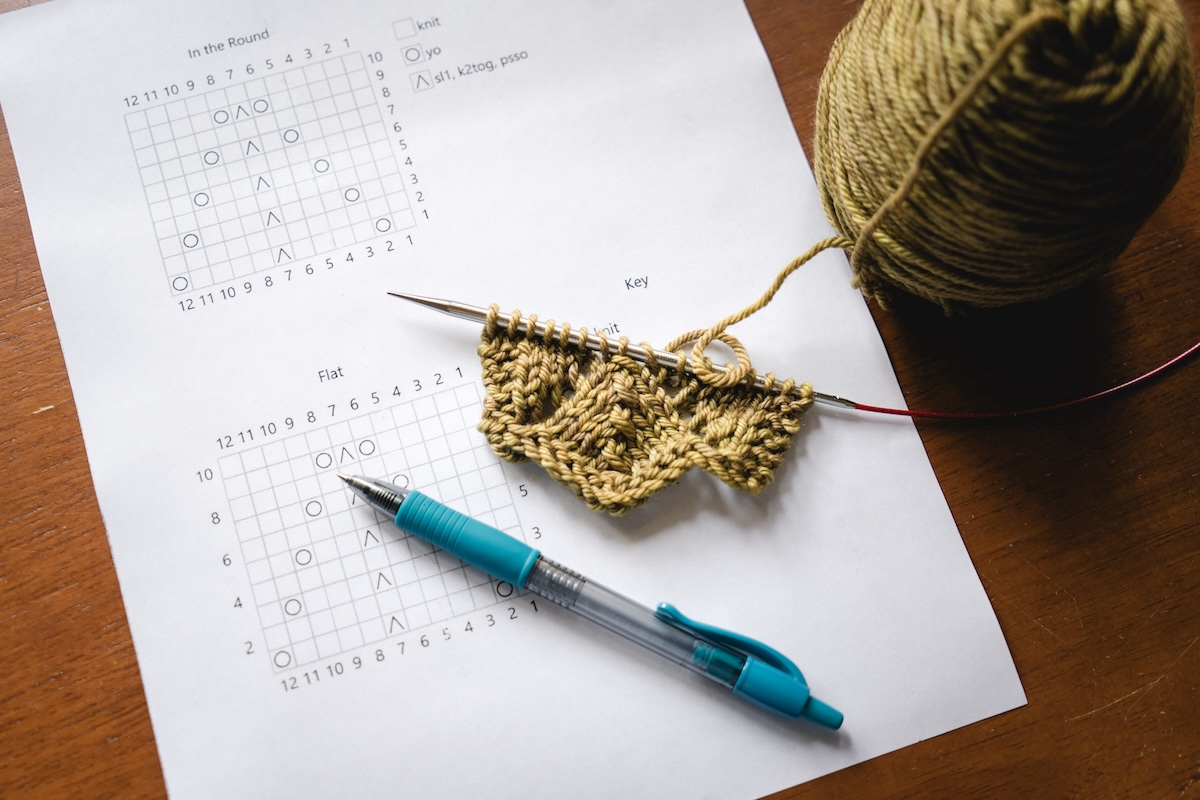
The most important thing to remember is that charts are intended to simulate the process of knitting. The chart itself is a visual representation of what’s on your needles, so go back to your knitting whenever you feel lost. That might sound nebulous and confusing, but fear not! We’re going to walk through two examples, one of a chart knitting in the round and one for knitting flat, and learn exactly how to read them.
Charts: Knitted in the Round
Example #1 is knit in the round. When you’re first learning to read a chart, starting in the round can be easier since you’ll read the chart rows in the same direction each time and you will only be looking at the RS (right side) of the knitting. You’ll read each line from right to left. (See those line numbers on the right side of the chart, those will be important later.)

Now, take a look at the key next to the chart. Each symbol has an abbreviation beside it, which defines the instruction it stands for. For example, a blank square = k, or a knit stitch. A circle within a square = yo, or yarn over, and so forth. If you know your knitting abbreviations, the key will give you everything you need to read the chart, one square at a time.
Reading from right to left, starting with square 1, the first line (Round 1) of the chart reads as follows: “K1, yo, k4 (there are 4 consecutive knit stitches), sl, k2tog, psso, k4, yo”.
And that’s it! You’ve read the first round of the chart and can execute those directions with your yarn and needles.
To read the next line, go back to the right side of the chart and follow the next line (Round 2): “K12 (there are 12 consecutive knit stitches)”. Remember, if you ever get disoriented about whether to read the chart line from right to left or left to right, look for the line numbers.
To read the next line, return to the right side of the chart and follow the third line (Round 3): “K2, yo, k3, sl, k2tog, psso, k3, yo, k2”.
You’ll continue reading each line of the chart the same way. And that’s all there is to it! Breaking down each symbol as you come to it can be hard at first, and you may need to refer back to the symbol key frequently. That’s okay! Chart-reading abilities will grow with practice.
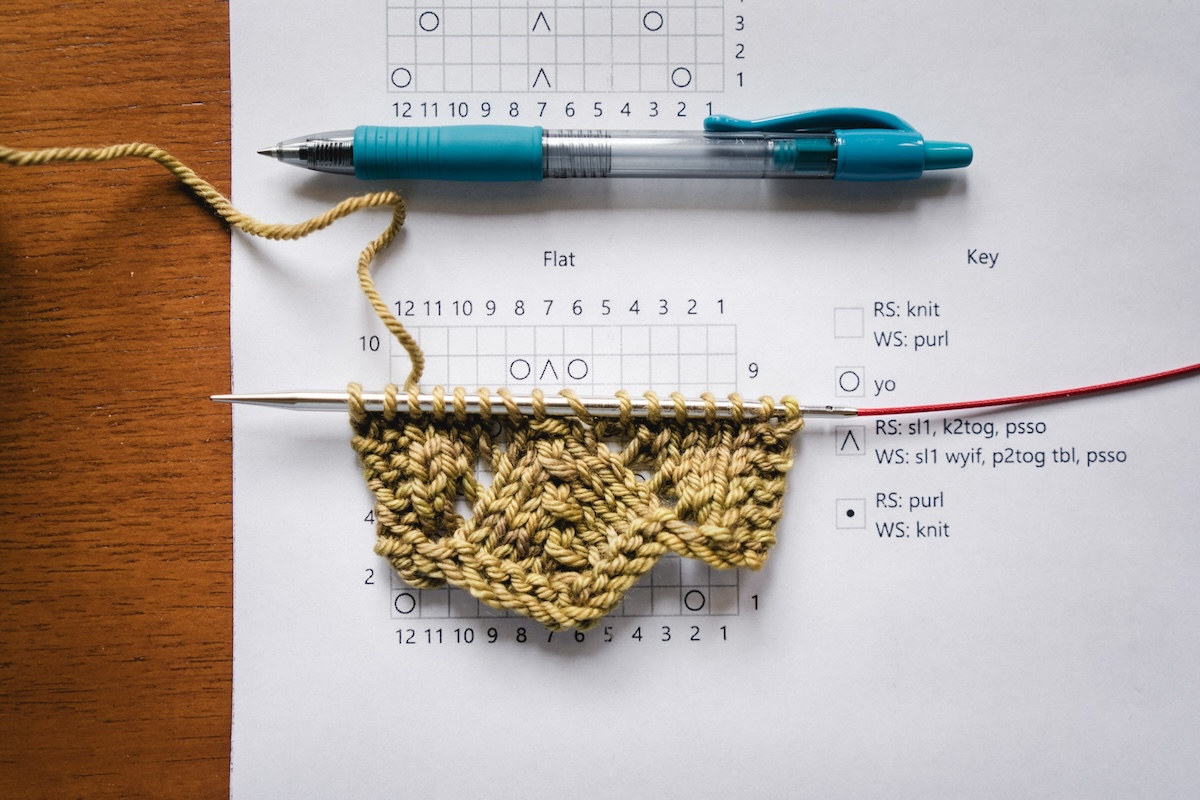
Charts: Knitted Flat
If you’re ready to tackle another chart-reading challenge, Example #2 is all about knitting flat from a chart!

Example #2 is a step up in complexity from Example #1. Notice that the line numbers alternate between the right and left sides of the chart. And many of the symbols in the key have two definitions: one marked “RS” and one marked “WS”. That’s because you’ll be working flat, with right side and wrong side rows, rather than working in the round with the right side facing you at all times. For example, a blank square = k (knit) on the right side, but is worked as a p (purl) on the wrong side row.
That sounds confusing written out, but don’t worry! It’s no different than a skill you probably already have—knitting stockinette stitch flat. To create stockinette stitch fabric, you knit when the right side is facing you and purl when the wrong side is facing you. Flat chart symbols take this into account, which is why any directions that would look different on the right side vs. the wrong side have two definitions.
To read the first line of the chart, start reading from right to left (since the line number for Row 1 is on the right). It’s a right-side row—pro tip, rows with numbering on the right are always right-side rows—so you’ll read the symbols based on the RS definitions from the key: “K1, yo, k4, sl, k2tog, psso, k4, yo”.
Easy, right? But wait—don’t start reading the next row right to left!
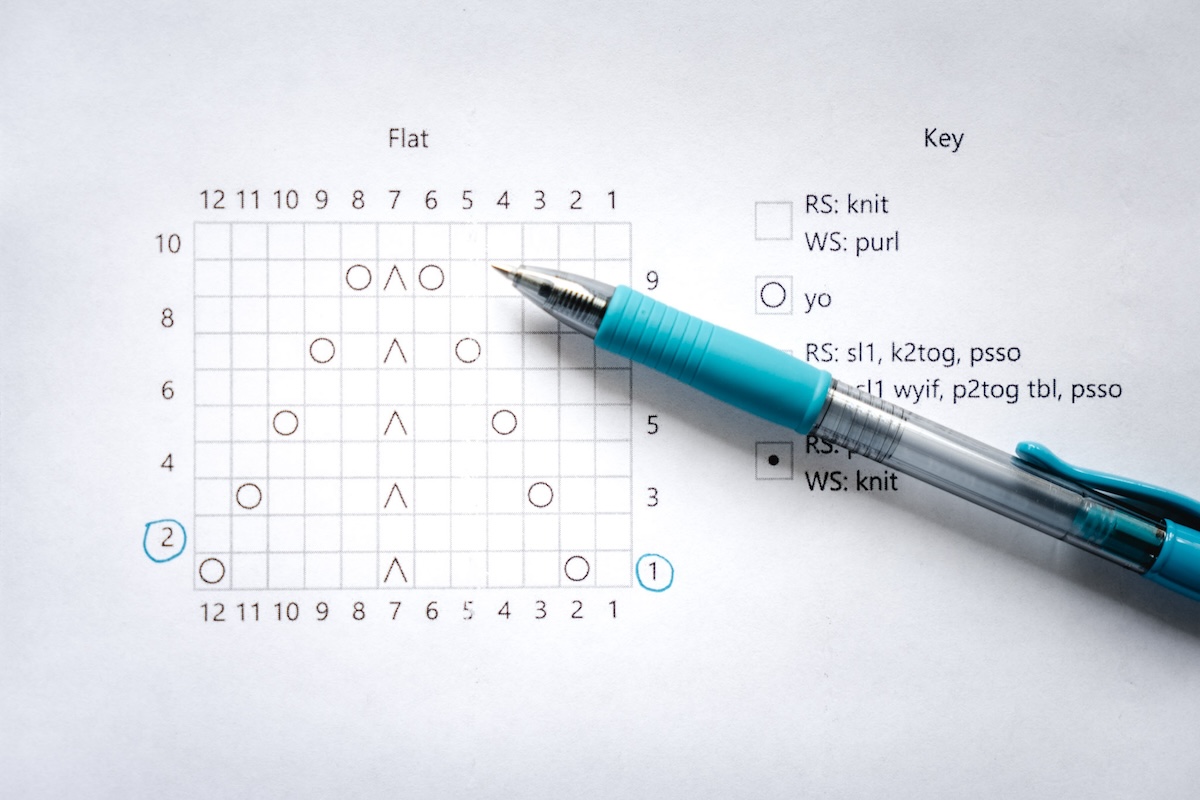
See how the line number for the next row is on the left. That means it’s a wrong side row, and you’ll need to read the next row from left to right, using WS definitions from the key.
To read the next line (Row 2), start on the left and follow the next line: “P12”. Remember, you’re using WS definitions for this row, so those blank squares are purl stitches rather than knit stitches (just like the wrong side of stockinette stitch).
Your Row 3 will be a right-side row, with the line number on the right side of the chart. Switch to those RS definitions and read Row 3 from right to left: “K2, yo, k3, sl, k2tog, psso, k3, yo, k2”.
And there you have it! You now know how to read charts in the round AND flat!
Like everything else in knitting, working from a chart will be cumbersome at first. Over time, you’ll find yourself checking the symbol key less and less, and intuitively knowing how to read a row or round—just like your hands built up the muscle memory to knit.
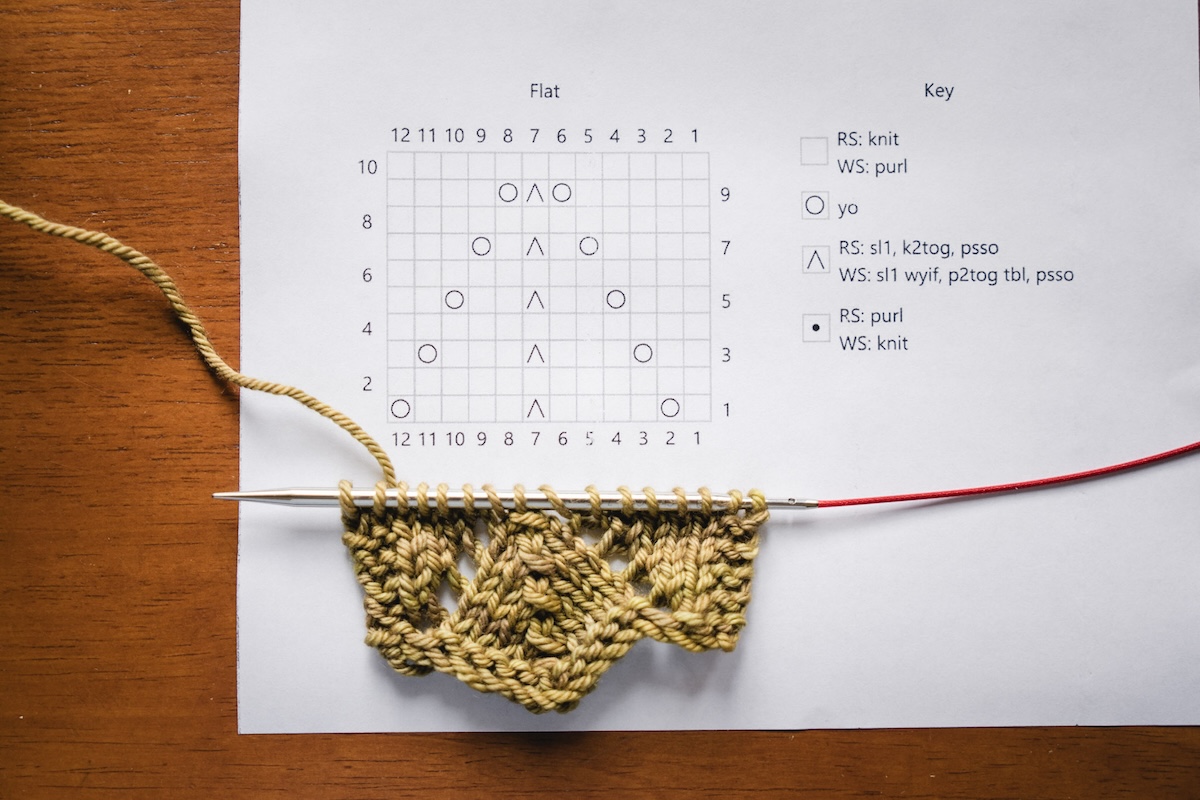
In case you’re still wondering, how do you know quickly whether a chart is knit flat or in the round? I’ve labelled the examples below, but there’s an easy way to tell without it being spelled out.
For both charts, notice how each line of the graph is numbered. In the chart on the left, all the line numbers are on one side of the chart. In the chart on the right, the line numbers alternate between the two sides of the chart. That’s your clue! When all the numbers are on the same side of the chart, that means it’s knit in the round. When they switch between left and right, that means it’s knit flat.
Reading Your Chart and Your Knitting Together
One of the best things about knitting from a chart is that it’s much easier to compare your knitting to the instructions and find your place or catch mistakes.
If you’re getting lost, just remember that the stitches on your right-hand needle are the chart row you’ve just knitted, while the stitches on your left-hand needle reflect the previous chart row. It sounds obvious, but it can be a lifesaver if you get lost working from a chart. You can compare the row you’re currently working on or previous rows to the chart—which is a visual representation of how your knitting should look! If it doesn’t look like the chart, find the spot that looks different and compare the instructions with what you worked on to find the mistake.
The World of Knitting Knitting Abbreviations and Charts is Now Yours!
Now you have all the tools you need to read any knitting pattern and follow it! Be patient with yourself as you learn these new skills, and practice, practice, practice. Confidence will come with time and allow you to knit things you never thought you could.
*The swatch shown in all the pictures is knit in SweetGeorgia Yarns Superwash Worsted.
Want in learn more about knitting, knitting gauge, finishing knits, lace knitting, and much more? We’d love for you to join us over at the School of SweetGeorgia where we have a large range of online video workshops along with fabulous instructors and a community of makers helping each other out along the fibre crafting journey. Use the code EXPLORETHESCHOOL to get a 14-day trial for just $1! We’ll see you there!
The post How to Read Knitting Abbreviations and Charts appeared first on SweetGeorgia Yarns.


